Kumihimo Tips & Hints
Kumihimo Tip #1 How to Attach End Caps
Kumihimo braids make great necklaces and bracelets.

 There are many creative ways to finish the ends. Adding ends caps with a hook & eye or magnetic clasp is one of the easiest and cleanest endings. You will want to use a strong heavy duty thread and you'll want a sewing needle that is sharp enough to easily go through the Kumihimo braid.
Stitch up and down through the ends several times. You are just trying to secure the threads. Then wrap the thread around the ends three or so times and the stitch through the cord again. Tie (or knot) and cut the thread.


With a sharp pair of scissors, cut through the end of the cord so it is flush with the wrapped edge. Apply a generous amount of glue, like Weld Bond, to the end of the cord that you have just prepared. Get plenty of glue on the tip and sides of the finished area. Position the ends of the braid into the end caps. Clean away any excess glue that is on the surface of your end cap and let dry for 24 hours. Weld Bond glue will dry clear. 


Kumihimo Tip #2 Tips on a Looped En d Finish
 d Finish
The “Looped End” is another way to finish the end of a braid. If you aren’t going to add end caps, you can simply create a loop. This technique works when you are using even numbers of colors as you will not be cutting the ends.
Measuring your yarns: For a standard round braid, determine the finished length of whatever your are making, double that and add 4 to 5 inches.
 of whatever you are
  making. Then, double that again! Remember, since you will be folding these strands in half (to create a loop) you will only cut half as many strands. 4 strands folded at the midpoint will give you 8 ends or strands to work with. Braid the middle section of your thread. When you fold your yarns in half, you want an equal length of braid on either side of the midpoint
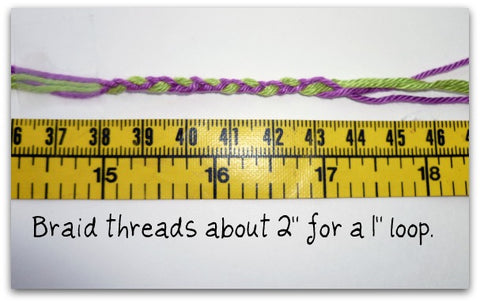
If you want a loop that is 1″ in height, you will need to braid a 2″ section.
Next, fold the braided section over an object that will serve as an anchor. You can use a pencil, a knitting needle or whatever works. Insert your yarns through the center hole of the disk with the anchor on the underneath side. Start braiding. You can remove the anchor after you feel the point of braiding is secure.
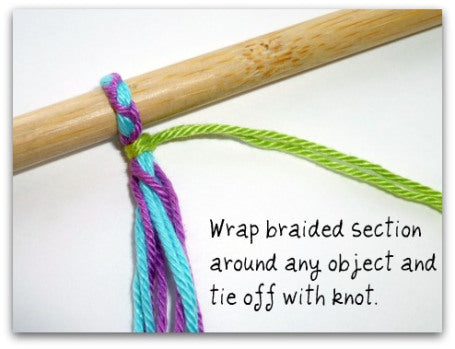


And there you have a neat looped end! Remove the tie-off string.
Kumihimo Tip #3 What kind of glue works?

Everyone that has taken one of my classes knows that I like to use WELDBOND glue for attaching end caps to finished braids. This great glue dries clear in an hour and cures in 24 hours. The longer it is left, the stronger the bond. It's great stuff. WELDBOND is available through ACE Hardware stores. If your local ACE Hardware doesn't carry it, you can order it online and it will be delivered FREE to your local ACE Hardware Store.
[youtube https://www.youtube.com/watch?v=t17A2x1DYN4?rel=0&controls=0&w=560&h=315]Kumihimo Tip #4 Make your own bead mix.
Alot of us have been very busy making Kumihimo necklaces with lots of 6/0 seed beads. Finding the right size tube of beads for each project is not a perfect science so we inevitably end up with extra beads. Don't despair. Collect colors that you like and "Make Your Own Mix". Think about some different color schemes that you like and collect accordingly.
Kumihimo Tip #5 Take Notes!
Okay, many of you, especially if you have taken a class from me, have heard me say "take notes". I have a little wire ring notepad and I TRY to take quick notes each time I make a braid. This i s a valuable tool!
1. Give your braid a name (something that describes it).
2. Take a bobbin and trace around it to make a "disk".
3. Label the position of your strands.
4. Make notes on your colors and types of thread used.
5. Makes notes on the cut length of the strands.
6. If you are making a beaded necklace make a note of which strand(s) you strung with beads and also keep a tally of the grams of beads used and note that too.
7. Make a note on how you finished the ends; ends caps, tie, looped end, etc.
8. Add anything special; like adding a focal bead and starting in the middle, note if you cut a strand too long or too short...anything that could help you down the road.
Kumihimo Tip #6 How Many Beads Do I Need?
The type of beads, thickness of "string" and the finished length of what you are creating will affect the usage and consumption of beads.
I have a couple of ways that help me determine how many beads I need:
1. REPEATING WHAT YOU HAVE ALREADY DONE: I have made many beaded necklaces that I can use as references to tell me how many grams of beads I will need. This is where "taking notes" comes in handy (last months Kumihimo Tip #5). For example, I made a 3x3 Cube Bead necklace using 8 strands of C-Lon Tex 400 with beads on all 8 strands. The finished necklace , including end caps, is 17" long and the beaded portion is 14 1/2 ". I used 26 grams of beads. If I divide 26 grams by the beaded portion, 14 1/2", that gives me a yield of about 3 1/2 grams per 2"of beaded section. The beads I used came in 9 gram tubes so I used about 3 tubes. Somebody else could use this information to help estimate their bead requirements. If they made the same necklace but longer, say 19" with the beaded portion measuring 16 1/2" then the bead requirement would increase to just under 30 grams of beads
2. THE MORE SCIENTIFIC METHOD: Whenever I use a new type of bead I take a more calculated approach and I make a "sample" first. For example, I measure and cut 8 strands of C-Lon Tex 400 (about 12" for this purpose) and then I add 8 beads on the strands that I want to carry beads. In this case, I put 8 6/0 seed beads on each of my 8 strands of C-Lon Tex 400. I used 64 beads total (8 x 8). These beads weighed 4 grams. After braiding and exhausting my numbered supply of beads, the beaded length of braid was 1 3/4". Using these numbers similar to the above example, you now have another way to estimate your bead requirements.
1. When in doubt, buy extra beads. You will always be able to use them somewhere, somehow.
2. When in doubt, cut your strands long! It is recommended to cut the strands that will carry beads 2x as long as without beads. I have found, for me, that 1.5x seems to work pretty well.
3. Buy a scale to weigh your beads. It really comes in handy!
4. Take notes...type of string, length of beaded portion, weight of beads, type of beads (seed, cube, magatama, etc), size of beads (4/0, 6/0, 3x3, 4x7, etc), brand of bead (all beads are not created equal), did you use a combination of beads (different sizes, different types)? The more you write down, the better!
Kumihimo Tip #8 An easy way to count!
 I learned about this great gadget from Mimi Hook of Bethesda, Maryland. She called me one day and said "I've found the greatest app - it makes counting really easy. It's for knitting but it works for Kumihimo".
"StitchMinder is a free stitch counting utility application for the Apple iPhone and iPod touch. The program provides four customizable counters that can be used to track rows completed, pattern rows, increases, and decreases. Counters can be configured to count upwards or downwards, and your counts are always stored when you close the program or if you are interrupted by a phone call."
It's super easy to use. You simply tap on the number on the touchscreen and the number increases with each tap. You can also add "sound" so you can hear each tap. Go to Settings on your iPhone or iPad, find StitchMinder and turn the sound to "on". Wonderful. Thank you Mimi for sharing this discovery!!!
Kumihimo Tip #10 The Trick to Threading Beads on Satin Cord
I love all the design possibilities with beads and petite satin cord and I thread LOTS of beads!
There are many factors when it comes to beads and cords. The #1 factor is that NOT all beads and satin cords are consistently the same size. The diameter of the petite satin cord can vary from one spool to the next and we all know what bead hole sizes are not the same. I use Toho and Miyuki 6/0 Seed Beads and Miyuki Magatamas and these are the most consistent in quality and size. It's a given, some beads are easier to thread than others.
So, what can you do? First and foremost, take your time and do it right. Keep your work clean & neat and you will have great success!
Preparing the petite satin tips for threading beads:
1. I start out by measuring and cutting my cords and securing them to  my Hamanaka Kumihimo Disk. Once all of my threads are in place on the disk, I go about preparing the tips.
2. Think of it this way, you are essentially turning the tip of your satin cord into your needle. The cleaner you work, the better your result will be. This is very easy. First, squeeze out a dime size portion of glue on a piece of scrap paper.
3. Then take one cord at a time and just barely roll it in the glue. You don't need much  glue. You are only using the glue to stiffen the tip. I touch the satin cord in the glue and then quickly smooth it with my fingers. That's it. Then I set it down to dry and I move on to the next cord. When I do this, the glue extends anywhere from 1/4" to 1/2" up my cord. I keep my fingers clean!
4. After the glue is dry, dry, dry (no more than 5 minutes), I take a SHARP pair of scissors and cut a slant toward the tip. You want to create a nice tip with a gentle transition to the cord.
5. When you are done cutting your tips, you are ready to bead.
6. I highly recommend that you get a small bowl and put your beads in the bowl. Always put the cap back on your bead container when you are done. If you don't, you will more than likely end up with your beads all over the floor. I have learned this from experience...more than once.
Since I originally wrote this tip, I have found that that applying Fray Check to the tips of the cords works better than glue. Use the same method, but change the product!
Kumihimo Tip #11 Beads & Color
When choosing bead colors, I have found that throwing in a "splash of clash" or mixing up the types of beads adds nice character. For example, mix up some opaques with some silver lined beads. I like what the "sparkle" adds. As I write this, I hear my mother whispering in my ear. She is the best when it comes to color and I am repeating what she has shared with me! Salt and pepper (a little white and a little black) are good too. Experiment and have fun. And if you don't like something - take it out and try again.Kumihimo Tip #12 Always Have Fun!
ALWAYS ENJOY WHAT YOU ARE DOING...."Life should not be a jo urney to the grave with the intention of arriving safely in an attractive and well preserved body, but rather to skid in sideways- Kumihimo Disk in one hand, Knitting Needles in the other, body thoroughly used up, totally worn out and screaming "Whoa, what a ride!"
Take pleasure in the small things, have fun creating, try new things, make a mess while you're doing it, don't make up excuses, JUST HAVE FUN!
Kumihimo Tip #13 Threading Large Hole Beads
 This is a very handy tip to keep in your "toolbox". Often, I start my Kumihimo braids with a Lark's Head Knot. I use a piece of string and here's why: When I am all done braiding, and before I attach my end caps, I use the "tails" of my Lark's Head Knot to thread my focal beads onto my bracelet or necklace. Works like a charm!
[youtube https://www.youtube.com/watch?v=bHbgxKtmWX0?rel=0&controls=0&w=560&h=315]
Kumihimo Tip #14 Braiding with Beads
 “Left Bottom Up, Right Top Down, Clockwise Turn to Next Pair"
1. Position lengths of cord on your disk and secure in slots. After the cords are in position, thread the beads onto the cords. I push some of the beads to the edge of the disk and wrap the remaining beads inside the bobbins. I access more beads as needed.
 2. Take the left bottom cord and slide one bead toward the point of braid.
3. The bead will slide underneath the first horizontal cord. Keep the bead to the outsid e of the braid.
4. With the bead underneath the horizontal cord, complete the move and insert the thread so you have three at the top.

5. If you are "dropping" beads with every move, your next move would be "Right Top Down". Move bead toward center of braid.
 6. Slide bead under and to outside of horizontal cord. Photo shows both beads in position. Continue braiding. Drop beads as pattern specifies.
Notes: When I use beads as accents only, I thread the beads on a variety of cords (i.e. satin, yarn, embroidery floss, perle cotton, silk, etc. When I am making an “all bead”necklace (solid beads on all cords), I use C-Lon Bead Cord or Tex 400 for added strength.
Kumihimo Tip #15 Disks, Disks and More Disks
Many of you already have more than one Kumihimo Disk which makes it easy to have multiple projects  going at one time. You might have one disk that you use for quick projects and another disk may be warped with a project that will take a little more time.
 Another thing to think about is having different disks that you designate for "thicker" cords and other disks which you use with "thinner" cords. For example, I have disks that I use with the petite stain cord, C-Lon Tex 400, yarn and leather and other disks that I "save" for using with smaller diameter beading cords, embroidery floss, etc. When braiding on a disk, you rely on the tightness of the "slits" to keep your cords under tension to produce a nice braid.
I use the 6" Hamanaka Kumihimo Disks as well as the smaller 4 1/4" BeadSmith Mini Kumihimo Disks. I use both sizes of disks with "cord only" braids and ALSO with "beaded braids". For most braids, I think the two sizes of disks are interchangeable. I have used up to 20 small EZ bobbins on the mini disk and find it very comfortable.
Click here to view 6" Kumihimo Disks and 4.25" Mini Kumihimo Disks.
Kumihimo Tip #16 Stringing Magatama Beads

 If magatama beads are all threaded in the same direction they will "spoon" each other. You will notice when you
  start threading the Magatamas that you can either thread "upwards" or "downwards". I thread "upwards". Consistency is what matters. The top picture shows the Magatamas aligned "directionally" and the bottom picture shows the magatama beads in a "random" alignment.
Sometimes the Magatamas may not look like they are "spooning" even though you know you strung them correctly. Going in the directions that the beads are slanting, simply run your hand from top to bottom and this will align the beads (if you strung them correctly)!
Kumihimo Tip #17 Freshen up Your Braids
Finishing Touch or Touch Up!
reminded of it when I returned home from Spain. I packed very carefully for my trip but by the time I returned, 2 weeks later, my suitcase was not so perfect. In fact, many of my Kumihimo necklace had rolled around until that looked a bit out of sorts.Kumihimo Tip #18 Tips for Stringing Beads

 It is a flexible needle and the "eye" runs the length of the needle. The wide eye needle works with C-Lon Tex 400 and 6/0 seed beads and the magatamas very nicely. Wide eye needles come in different lengths. I use a 5" wide eye needle. Thread the beads on the needle and then slide them onto the thread.


Kumihimo Tip #19 Which Size End Cap?
Here you go...my notes on end caps sizes! I created this chart to he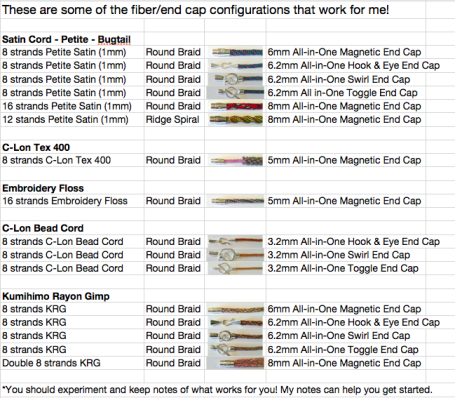 lp you match various fiber combinations with the different sizes of end caps. This is based on items that I sell in my shop or that I use on a regular basis. I think the easiest thing to do is to purchase the end caps in a range of sizes and that way you can easily mix and match until you find the right size for your braided creations. Keep a little notebook and jot down which size combinations work for you and pretty soon there will be no mystery in determining which size end caps you need. Add to my chart and make it yours. This chart represents "some" of the end caps at What a Braid.
Kumihimo Tip #20 Preparing Ends
 Fray Check, Fray Check, Fray check...oh how I love it. This is another great way to prepare the ends of almost any cord for stringing seed beads, magatama beads, large hole beads, etc. This is a super technique and a great way to work quick and clean. After cutting my cords for my braid, I put a dollop of Fray Check on a scrap paper and then quickly roll the tip of each cord in the Fray Check (or similar product). I let it dry thoroughly and then I am ready to thread my beads. When I am stringing 6/0 seed beads or magatama beads onto petite satin cord, I don't;'t even have to trim the tips to a point. If I get and cord end that's a little thick, I roll it my fingers and that usually solves the problem! So, I recommend that you get a bottle or tube of Fray Check and keep it on hand.
Kumihimo Tip #21 How Many Beads Do I Need?
 answer. I usually suggest braiding a beaded gauge. You may need to read through this a few times!
Japanese Size 8/0: 39 beads per gram (Miyuki); 43 beads per gram (Toho)
Japanese Size 6/0: 12 beads per gram (Miyuki); 15 beads per gram (Toho)
My 8/0 seed beads come packaged 11-12 grams per pkg (approximately 450- 492 beads/pkg).
My 6/0 seed beads come packaged 10 - 11 grams per pkg (approximately 135 - 148 beads/pkg)
6/0: 240 beads /6 inches would take 2 pkgs of 6/0 seed beads (with some extras)
Kumihimo Tip #22 A Simple Tip for Counting Beads 

This is a great tip if you are threading all the same color beads on a cord. We have all pulled out a pattern and looked at the part of the pattern that says, "thread 50 (and you're lucky if it's only 50!) beads onto each cord, tie a knot in the end and do this same thing to every cord". You look at those little tiny beads and you think you can't even see the hole. You wonder how you are going to count all those beads. You start stringing your beads and it's not very much fun. You keep thinking, "I should get my reading glasses or at least turn on a better light".
This is a trick that works great if you are threading all the same color beads on a cord. It's simple but not everyone knows about it. First, you string 50 beads on the cord. This is the number I chose for this example. It could be 150. The first time around you need to count. Once you have threaded the correct number of beads, take out a measuring tape and measure the length of the strung beads. In this example, I now know that 50 beads is approximately 4". On the remainder of my cords, instead of counting I just need to string 4" of beads on each cord. That is alot easier than counting. If you go over it doesn't matter. You just simply stop "dropping" beads when you come to your first cord without any remaining beads. From there, braid with cord only. Is that easy?!
How do you actually get the beads on the cords? Some things you can do include using the thread as a "self-needle" (very easy with C-Lon Tex 400 and also works with C-Lon BeadCord), you can use a wide eye needle and if you have a Bead Spinner you could use it. Need a reminder? You might want to take a look at an old Kumihimo Tip #18.
Kumihimo Tip #23 Beaded End Caps

Beaded End Caps are alot of fun and a great way to embellish your Kumihimo pieces. I do not profess to be an expert by any means but I do enjoy adding beaded end caps to many of my braids. Ann Benson's YouTube tutorial helped me alot. Purchasing a magnifying visor also made it alot easier to work with those itty bitty beads. My beaded end caps are Flat Even-Count Peyote Stitch and then they are zipped together to wrap the braid. I wish there were more hours in a day! There is so much fun stuff to learn.
Kumihimo Tip #24 Designing with Color
 I was taught by my mother, who has a gift for putting colors together, that Mother Nature is our best teacher. If you look at something beautiful in nature and then think about the different color elements, you will see some amazing color combinations. Another resource that I recently learned about, from a Kumihimo friend, is Design Seeds. This is a free resource that you can subscribe to and you will get "color boards" (like the one on the left) emailed to you each day. You can subscribe at http://design-seeds.com. Whether you are looking to combine fiber colors or bead colors, this is a super tool.
Kumihimo Tip #25 Pairing Cords with Seed Bead

- When I make a braided rope with all 8/0 seed beads, I use C-Lon Bead Cord. (approximately 0.5mm and 34 lb breaking strength)
- When I make a braided rope with all 6/0 seed beads, I use C-Lon Tex 400. (approximately 0.9mm and 75 lb breaking strength).
- When I mix bead sizes (6/0 and 8/0), I find it works well to use the finer cord (C-Lon Bead Cord).
Hope that helps!
Kumihimo Tip #26 Check Your Work Frequently
A
 friend of mine sent me an email the other day and said, "I got to the end of my beautiful beaded necklace and when I looked at it, I had missed a bead".
This tip is to serve as a reminder to periodically check your work. Sometimes I can get carried away with my braiding and then I get to the end and I find that I have missed a bead. Without hesitation, I braid backwards until I reach my mistake, fix it and then move forward. It's pretty quick to "un-braid". If, however, you make a mistake and you think you can "live with it" then move forward happily. This is okay too.
When braiding with beads, missing a bead can do a few things to your braid some of which include:
I have a customer that was working on the "Beaded Petal Fringe Necklace" and she could not get the petals to line up. She checked her beads to make sure they were strung correctly. Her bobbins were marked. She was doing everything right but just could not get those darn beads to "line up". So I suggested that she send me her disk, braid and bobbins with the work she had done so far and I would take a look at it. I received it in the mail, fixed it in the Post Office parking lot and returned it. About a 1/4" before she started dropping the "petals" she had missed a bead and that one missed bead threw off the entire braid. A simple, simple mistake. But frustrating. Check your work as you go and watch for those missed beads!
Kumihimo Tip #27 Spiral Bindings are Great!

Kumihimo Tip #29 Starting in the Middle

Kumihimo Tip #31 Left Bottom Up, Right Top Down or ….

Kumihimo Tip #32 Dental Floss? Kumihimo?
Maybe I am the only one who didn't know about this trick, but I will share this with you anyway. There is more than one use for dental floss!
Kumihimo Tip #33 A Better Way to Find Your Place!
Learn to read your braid. This is something that you should get in the habit of doing and as you braid more this will become second nature. Learning to "read" your braid is invaluable.
What I will share was first explained to me by one of my dearest teachers, Rodrick Owen. He kept telling me to look at my "uppers" and "lowers" to direct my next move.
 |
|
Karen Huntoon©2015
|
1. Look at POB (Point of Braid)
Kumihimo Tip #35 Let's Talk About Disks!
I'm talking about the round foam disks with 32 slots. The Foam Disk makes learning to braid affordable and once you are completely addicted to Kumihimo, the foam disk is small enough to put in your purse so you can braid any time. One customer says she braids when she is in her car and stopped in traffic! The foam disk is convenient when you are waiting for an appointment not to mention traveling on airplanes, etc. I wrote a short article for CNCHNet, Kumihimo - The Perfect Portable Project. I think the Foam Disk is a very valuable tool.
The original disk 6" Hamanaka Disk is the fabulous invention of Makiko Tada.
 The disk is lightweight, easy to hold and the dense foam provides just the right amount of tension to hold the cords taut. There are plenty of knock-offs but, in my opinion, the Hamanaka is the best. I have used several and after years of use (and I use my disks alot) my Hamanaka Disk is the best. The original Hamanaka 6" disk is 10mm thick. I like this disk for Petite Satin Cord, Yarn, Kumihimo Rayon Ribbon, Kumihimo Rayon Gimp and C-Lon Tex 400.
 Kumihimo Starter Kits. I thought "small hands, smaller disk". To make sure everything worked in my new instructions, I played with the small disk alot. I learned it is not just for kids. Infact, many adults like it better than the larger 6" disk. You can braid with the same fibers that you use on the 6" disk and the resulting braids are identical. I happen to love the mini disk. If it gives you any indication of my addiction to Kumihimo, I can fit several Mini Disks into my purse at one time!
  twice as thick as the original disk. At 20mm, the thickness of this disk is best
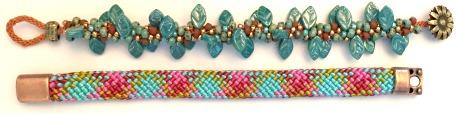
Kumihimo Tip #36 Let's Talk About Bracelet Sizing!
Some are flat, some are t
to fit close to the wrist, others a little looser, etc. The requirements for bracelet sizing are more precise than for a necklace. A 1/2" in a necklace is not so critical as it would be for a bracelet (unless of course you are talking about a choker)! The Bracelet in photo is one of the classes Karen is teaching in Mexico. Kits available soon!
There are published charts all over the internet with suggested finished length bracelet sizes (chart below).
| Women's Bracelet Sizing | Length |
| Small | 7" |
| Medium | 7 1/2" to 8" |
| Large | 8 1/2" |
| Plus | 9" |
Or you can be a little more precise and measure your wrist.

 |
|
The "bulkier" bracelet is longer than the flat bracelet, yet the desired finished length and fit is nearly the same. Bulkier bracelets require more length.
|
Desired Finished Length of Bracelet = Rough Bracelet Length + End Cap
Rough Bracelet Length = Desired Finished Length - End Cap.
Kumihimo Tip #37 Threading PIP Bea ds on C-Lon Bead Cord!
 ds on C-Lon Bead Cord!
 into the container of Fray Block about 2 inches up the C-Lon. This takes but seconds! I use Fray Block because it dries quickly and it does not add any thickness to the cord end. I do NOT use Finger Nail polish!