Kumihimo Tip of the Month - Beaded Necklaces Posted on 30 Sep 10:26
I have been thinking about beaded pattern issues. As beaded patterns get increasingly intricate, more and more of you are running into issues. I know first hand how frustrating it is when you have spent hours threading beads and then you finally start braiding and "darn it" the beads are not lining up like the photo on the pattern. For a few of you that have had issues, I have welcomed that you send your necklace, in it's current state, so I could take a look at the problem. I have untangled bobbins and figured out alot of things.
Here are SOME of the things I have found that might help:
Here are SOME of the things I have found that might help:
1. Beads are threaded incorrectly; often one too many beads or one bead too short. Just one single bead can throw off the entire pattern! Hardly seems fair that when you are stringing over a thousand beads, that one mis-bead can throw off the entire braid. Check your beading sequences frequently. With repeat patterns, you are able to see the pattern pretty easily and a mis-bead stands out - if you remember to look!

2. Sometimes when I braid backwards to un-do a troubled braid, I will find that a bead was missed altogether or sometimes two beads have been dropped at the same time. I have also found that cords are sometimes crossed. For example, let's say you move your left bottom up, now there are three at the top, next you move the right top down but instead of taking the cord straight down, it gets crossed over the other other cord. This will cause a mess.

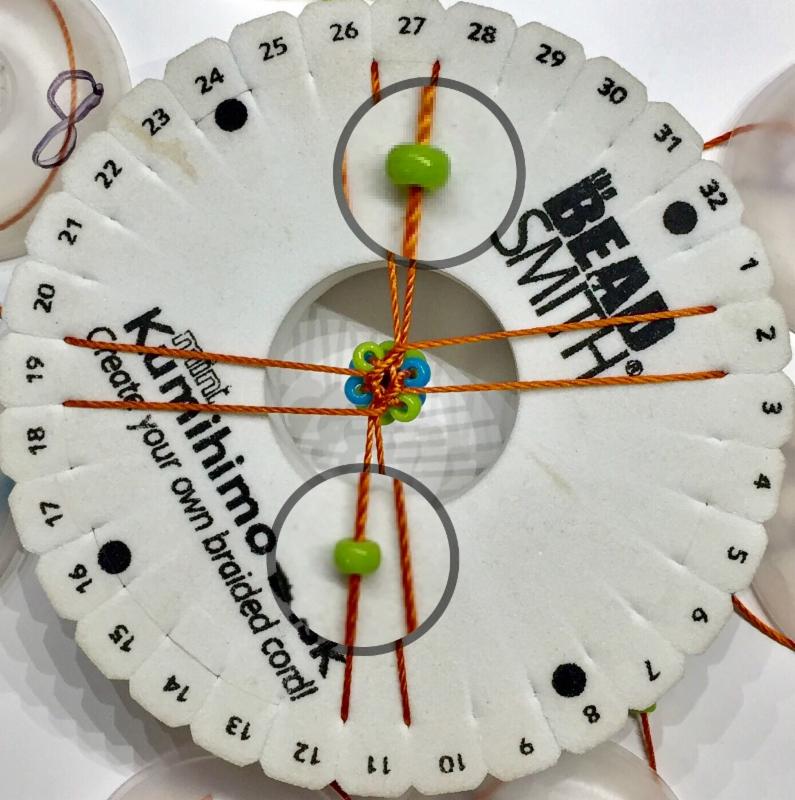
3. Starting Position. Often, on my beaded braid kits, my instructions will say, "Braid "x" amount with C-Lon Beadcord only. This is to create a cord end for attaching an end cap. When you are finished braiding with C-Lon BeadCord only, make sure the bobbins are in the starting position 1, 2, 3, etc. going around the disk clockwise". And then the instructions say, "You will drop your first beads from Bobbins 2 & 6, i.e. left bottom up, drop a bead, right top down, drop a bead, rotate, repeat". With some beaded patterns, if you do not do this step, your beads will not align properly. If you look at the photo (right) you can see that I have started braiding without beads to create a "nub" to attach an end cap. When I end this section of braiding with C-Lon Beadcord only, I braid until the bobbins are in the "starting position". Depending where you are on your braid, this only takes a few moves to get to the "starting position". Also, make a note that the numbers onto disk do not matter (it's the number on the bobbins that is of concern). Next, take a look at the point of braiding (center of the disk where the cords intersect). There are two things going on here. First, the bobbins are in the correct positions and even more importantly, Bobbins 2 & 6 are in the lower position and ready to be moved with one bead from each cord. When I say "lower" position, I mean that cords/beads on Bobbins 2 & 6 are underneath the cords on Bobbins 3 & 7 and therefore the the cords/beads from Bobbins 2 & 6 are next in line to be moved. For beginners, this may be too much information but overtime I assure you it will sink in and you will say to yourself, "Oh, I get it, now I understand what Karen was talking about". P.S. Take a look at Kumihimo Tip #33 for another explanation of uppers & lowers.
4. A common problem that gets braiders into trouble is reading ahead and not following instructions. This is probably what causes the most problems. I always suggest reading through a pattern from start to finish before you start. It allows you to see where the instructions are taking you. Don't guess!
Things that might help. Look for similarities.
1. As you are threading the beads for a design that consists of repeats (the same portion of design over and over again), you will see a pattern in the line-up of the beads. Once I see the pattern, I check my beading frequently to make sure that the beads are lining up correctly. This takes but a second and saves headaches.
2. Once you are braiding you will also see similarities and patterns when you are dropping (adding) the beads. This is easier after you have had more experience. With some patterns, like a spiral for example, I will be dropping (adding) the same color bead at the same time, i.e. left up (Turquoise), right down (Turquoise), rotate, left up (Chartreuse), right down (Chartreuse). If all of a sudden I see left up, (Turquoise) and right down (Chartreuse) this should alert me that I have done something wrong. This is just a general idea, as all sequences are not the same, but when I see the pattern, I know the color bead of the I should be dropping with each move and when the right color is not there, I know I need to stop.


3. So, when I look at my braid and see a bead in the wrong place, I braid backwards until I get to that point and then braid back a little further to where the patten is correct. If I have not missed a bead along the way or dropped 2 beads at one time, or crossed my cords I then look at how the beads are threaded on the cords and compare to the instructions.
4. Take your time. Work in a neat and clean area. Make sure you have good lighting. If you need magnifiers or reading glasses, use them. Set yourself up for success. When you are tired, put your work aside. I know all of this from experience.
Happy Braiding !

There are tons of great tips at What a Braid for all things Kumihimo.
Check out Kumihimo Tips & Hints.
Check out Kumihimo Tips & Hints.